In today’s digital landscape, having a reliable and efficient content management system (CMS) is essential for businesses and individuals alike. Ghost CMS is a popular open-source platform known for its simplicity and powerful features. By combining the flexibility of Docker containers and the convenience of CloudPanel, you can easily deploy and manage your Ghost CMS instance in the cloud. In this blog post, we will explore the benefits of Dockerized Ghost CMS on CloudPanel and guide you through the process of setting it up.
Benefits of Dockerized Ghost CMS on CloudPanel:
- Seamless Deployment: Docker allows you to package the Ghost CMS application and its dependencies into a container, ensuring consistent deployment across different environments. CloudPanel, a user-friendly control panel for cloud hosting, simplifies the management of your Docker containers.
- Easy Scalability: With Docker and CloudPanel, scaling your Ghost CMS becomes effortless. You can easily add or remove instances of the Ghost CMS container to accommodate varying levels of traffic, ensuring optimal performance during peak periods.
- Resource Efficiency: Docker’s lightweight nature ensures efficient resource utilization, allowing you to run multiple Ghost CMS instances on the same server without significant performance degradation. CloudPanel provides resource monitoring and optimization tools to ensure optimal utilization of your cloud resources.
Setting up Dockerized Ghost CMS on CloudPanel:
To begin, make sure you have CloudPanel installed on your server. If it’s not installed, refer to our guide for CloudPanel installation instructions. Once CloudPanel is installed, follow the steps below:
- Install Docker and Docker Compose by executing the command:
sudo apt-get install docker docker-compose - Create a new folder where you will save the
docker-compose.ymlfile. Run the command:mkdir ghost/to create the folder. - Open the
docker-compose.ymlfile using the nano editor:nano docker-compose.yml. - Paste the following lines into the
docker-compose.ymlfile: [spacer height=”20px”]version: '3.1' services: ghost: image: ghost:4-alpine restart: always ports: - 2368:2368 environment: # see https://ghost.org/docs/config/#configuration-options database__client: mysql database__connection__host: db database__connection__user: root database__connection__password: example database__connection__database: ghost # this url value is just an example, and is likely wrong for your environment! url: https://ghost.yourdomain.com # contrary to the default mentioned in the linked documentation, this image defaults to NODE_ENV=production (so development mode needs to be explicitly specified if desired) #NODE_ENV: development db: image: mysql:8.0 restart: always environment: MYSQL_ROOT_PASSWORD: example - Save the
docker-compose.ymlfile and exit the nano editor. - Spin up the docker by executing
sudo docker compose up -d
Now, let’s proceed with the CloudPanel configuration:
[spacer height=”10px”]
- Log in to CloudPanel.
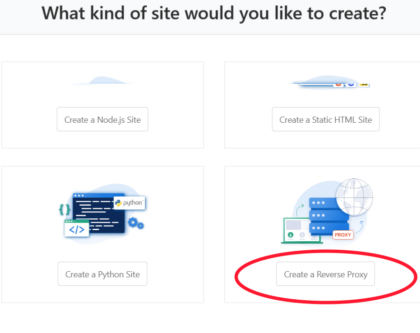
- Create a new site and select the “Reverse proxy” option. [spacer height=”20px”]
- Modify the Reverse Proxy URL to
http://127.0.0.1:2368. This will route all traffic to your Dockerized Ghost CMS, which is listening on port 2368.[spacer height=”20px”]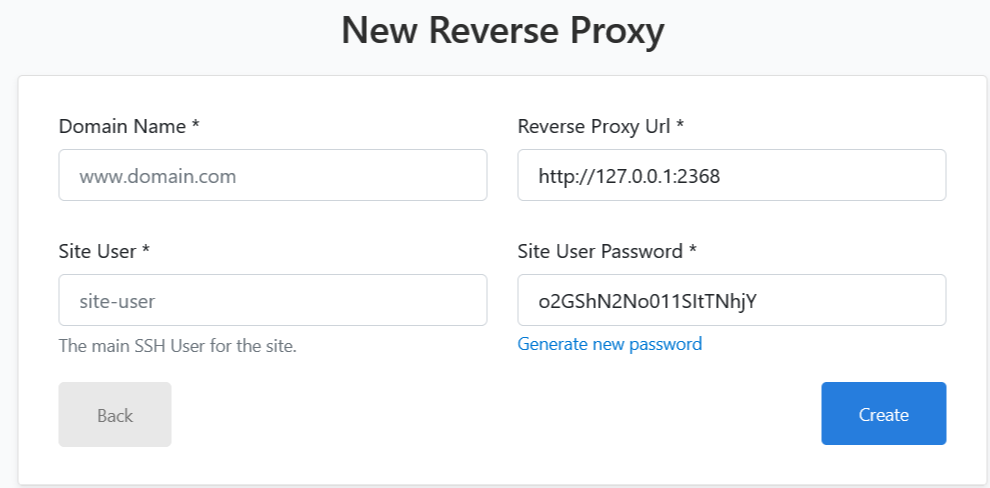 [spacer height=”20px”]
 - Finally, go to the SSL/TLS section in CloudPanel and request a new Let’s Encrypt certificate. Once the certificate is issued, you should be able to use Ghost CMS with the site you created for the Reverse proxy.